The iTach IR adaptors are perfect for controlling appliances like AV equipment (TV, Blu-Ray, Home Cinema), and any appliance that can be controlled by Infra-Red (IR) commands. Even Air Conditioning units.
This guides shows how to use the iTach adaptors with the VERA Lite and VERA3 Z-Wave Controllers running UI5.
Using iTach with VERA
To enable VERA to use the iTach devices, we need to download a VERA plugin, and then create device files for each IR appliance that the iTach will control.
This guide shows you how to:
- Download and correctly configure the VERA iTach (GC100) Plugin
- Create the device files for each appliance to be controlled
- Add the iTach IR Control strings to the device files
- Create a VERA device for the appliance
- Control the appliance's functions from VERA scenes
Step 1 - Download Files
To successfully install the VERA iTach (GC100) plugin and use the iTach devices you will need a number of files. We've made this easy and added them to a single ZIP file for you to download.
So before you do anything else, download the Vesternet iTach Zip File:
Vesternet iTach Files v2.0 (ZIP)
The ZIP file includes four files which you will use through the rest of this guide:
- I_GC100.xml - GC100 Plugin update file
- D_Bose_Sounddock.xml - Device 'Description' file (based on Bose Sounddock 2)
- I_Bose_Sounddock.xml - Device 'Implementation' file
- S_Bose_Sounddock.xml - Device 'Service' file
Step 2 - Install and correctly configure the iTach/GC100 Plugin
The iTach/GC100 plugin enables you to use and configure the iTach IR adapter.
Install the GC100 Plugin
- In the VERA UI go to the 'APPS' tab and 'Install Apps'
- Search for 'GC100'
- Install the app, it will then appear in the My Apps tab
- In the DEVICES tab you will see a new GC100 device
- Click the device's 'Wrench' icon and go to the 'Advanced' tab
- Enter the iTach IP address (see APNT-65 - iTach Basic Configuration and Learning)
- Close the device window and click the red 'SAVE' button
- You should now see the GC100 device in VERA's DEVICES tab
 Figure 1: Adding the iTach IP Address to the GC100 Plugin Device
GC100 Plugin - Known Issue
There is a known issues with the GC100 Plugin - it sends IR commands two times.
This is easy to fix by uploading a corrected 'implementation' file.
- Go to 'APPS' > ''Develop Apps'
- On the left-hand side-bar click 'LUUP Files'
- Click the ''Choose File' button and select the I_GC100.xml file (included in the Vesternet iTach ZIP file)
- Click 'Go'
- When the upload is complete you need to restart Luup
- Go to SETUP > Net & Wi-fi and click 'Reboot'
- Allow VERA to reboot
- You will now have a correctly configured and working GC100 plugin
![]() Figure 2: Configured GC100 Plugin
Figure 2: Configured GC100 Plugin
Step 3 - Create and Upload Device Files
To create an IR controllable device in VERA we first need to create and edit the device's control files.
This example is based on a set of files I created for a Bose Sounddock, this guide shows you the parts of XML files that you will need to change for your appliance.
- Extract the .xml files from the Vesternet iTach ZIP file
- Rename them so that you can recognise the device they refer to - for example 'XYZ', 'Yamaha RX675' etc
- You can use whatever name you like - for the rest of this guide I will refer to the files with the name Bose_SoundDock.
Edit the Service (S_ File)
The S_Bose_SoundDock.xml file is the 'Service' file for the IR device, it controls the appliance's actions. In this case we will define the IR actions that can be triggered by the iTach IR commands.
- Open the S_Bose_SoundDock.xml file in a text or HTML editor
- You will see an < actionList > tag at line 7, and below it a number of < action > tags
- These refer to similar < action > tags in the I_Bose_SoundDock.xml which contain the actual IR codes to control the appliance
- In the S_Bose_SoundDock.xml file edit these names, delete any you do not need or add new ones
- For this example I only needed two controls for the SoundDock - Bose Play and Bose Off
- Remember to save the changes when you have finished
- The final S_Bose_SoundDock.xml file is shown in Figure 3
 Figure 3: S_Bose_SoundDock.xml Device File
Edit the Implementation (I_ File)
The I_Bose_SoundDock.xml file is the 'Implementation' file for the IR device, it contains the actions and IR codes that will control the appliance.
- Open the I_Bose_SoundDock.xml file in a text or HTML editor
- You will see an < actionList > tag at line 3, and below it a number of < action > tags
- These contain the IR codes that will be transmitted when you activate each action
- Rename the < serviceId > to one that relates to the appliance - < serviceId >urn:a-lurker-com:serviceId:Bose_SoundDock< /serviceId >
- Note: the same < serviceId > is used for all actions in the I_Bose_SoundDock.xml file
- Edit the < name > tag so that it matches its action's description - < name >Bose Play < /name >
Add the IR Code
Now you need to take the IR Control Code you created in the iTach iLearn app and use it in the implementation file. See APNT-65 - iTach Basic Configuration and Learning for more information.
- The I_Bose_SoundDock.xml file uses the HEX IR Control code - in iLearn select HEX format
- Paste this code between the < ir > tags
- You can edit all the other actions, delete any you do not need or add new ones
It probably makes sense to add one action and IR code, and test it in VERA before completing the full I_SoundDock.xml file.
 Figure 4: I_Bose_SoundDock.xml Device File with IR code highlighted
Edit the Description (D_ File)
The D_Bose_SoundDock.xml file is the 'Description' file for the IR device, it contains the all information for the IR device. You need to add the main device descriptions and links to the Implementation and Service files.
Device Descriptions
- Edit the description lines to better describe the appliance this IR device will control (see figure 5):
< friendlyName >, < manufacturer >, < manufacturerURL >, < modelDescription >, and < modelName >
Implementation File Line
- Edit the < implementationFile > file name (line 120) to match your I_XML file - I_Bose_SoundDock.xml
Service Files
- Edit the last 'Service' section (line 31) to match the S_Bose_SoundDock.xml file:
< serviceType >urn:a-lurker-com:service:Bose_SoundDock:1 </serviceType>
< serviceId >urn:a-lurker-com:serviceId:Bose_SoundDock1 </serviceId>
< SCPDURL >S_Bose_SoundDock.xml </SCPDURL>
- Note: The ':1' and '1' after the file name in the first two lines
- The other Services are generic VERA service files - you can keep these or delete them from the D_SoundDock.xml file.
Unique Device Name (UDN)
This is an important step.
Each device must have a unique UDN (Unique Device Name), you can create your own for each IR device.
- Create a UDN by going to http://www.famkruithof.net/uuid/uuidgen
- Click Get
- At the top of the page you will see a new UDN number (bold) that has a format similar to b2f53800-b8ea-11e3-a5e2-0800200c9a66
- Paste this into the < UDN > line, after uuid:
< UDN >uuid:b2f53800-b8ea-11e3-a5e2-0800200c9a66 </serviceType>
- Your D_SoundDock.xml file should now look like Figure 5.
 Figure 5: D_Bose_SoundDock.xml Device File
Upload the files to VERA
These files now need to be uploaded into the VERA (similar to how you uploaded the GC100 plugin update in step 2).
- Go to 'APPS' > ''Develop Apps'
- On the left-hand side-bar click 'LUUP Files'
- Click the 'Choose File' button and select the D_Bose_SoundDock.xml. I_Bose_SoundDock.xml and S_Bose_SoundDock.xml files
- Click 'Go'
- When the upload is complete you need to restart Luup
- Go to SETUP > Net & Wi-fi and click 'Reboot'
- Allow VERA to reboot
- The device files will now be included in your VERA's Luup files
Step 4 - Create the IR Appliance Device
You can now create a VERA device that will use the files that you have just created. This device will be a 'virtual device' of the real appliance, you will be able to control its functions from VERA scenes.
- Go to 'APPS' > 'Develop Apps'
- On the left-hand side-bar click 'Create Device'
- Enter the 'D_Bose_SoundDock.xml' file name into the Upnp Device Filename box
- Click 'Create Device'
 Figure 6: Create the IR Device in VERA
- The new device will be in the DEVICES tab, but it will not have been fully configured
- Click VERA's blue 'RELOAD' button (top of the page) and wait for VERA to reload
- The device should now have the 'friendlyName' you chose in the 'Device Description' file
- In the device's Advanced tab, it should have the correct Description file (D_Bose_SoundDock.xml) and device type (urn:schemas-micasaverde-com:device:IrDevice:1)
- If it doesn't have these populated - click the 'RELOAD' button again and wait for VERA to reload
- The final thing is to configure the device with the correct iTach IR port - iTach has three IR ports, for this example I am using the IR Blaster (port 3) - see APNT-65 - iTach Basic Configuration and Learning
- Go to the device's 'Settings' tab and select the correct port from the drop-down
- Close the device and click the red 'SAVE' button (top of the page)
- After VERA has finished reloading, the device should be ready for testing
 Figure 6: Select the correct IR port for the appliance device
Step 5 - Test the IR Appliance Device
Now it's time to test the new device and check that it's working correctly.
- In your browser, enter http://VERAs_IP_address:3480/data_request?id=lu_invoke - replace 'VERAs_IP_address' with your VERA IP address
- Click on the appliance device from the list - for instance mine was #200 Bose SoundDock
- This will show a list of commands available
- Make sure you have the iTach's IR blaster/emitter in front of the appliance
- Click one of the actions in the browser - this should make the appliance perform that action
- If it doesn't work correctly, check the device files, correct them and upload them again
 Figure 7: Browser showing a list of actions available for the IR device
Step 6 - Use the IR Appliance Device in Scenes
Now you have the device actions working correctly via iTach, you can use VERA scenes to control the appliance's actions.
To do this you need to use VERA's Advanced Scene tab
- Create a new scene - see APNT-34: Creating Scenes in VERA
- Go to the Scene's 'Advanced' tab
- Select the IR Appliance device in the 'Pick a device' drop-down
- Click 'Add'
- The device will now have been added to the scene
- Select the action from the 'Please select' drop-down next the device
- Click the green 'Confirm changes' button (top of the page)
- Click the red 'SAVE' button (top of the page)
- You now have a scene that can be triggered, scheduled or run manually to control an action(s) of the appliance
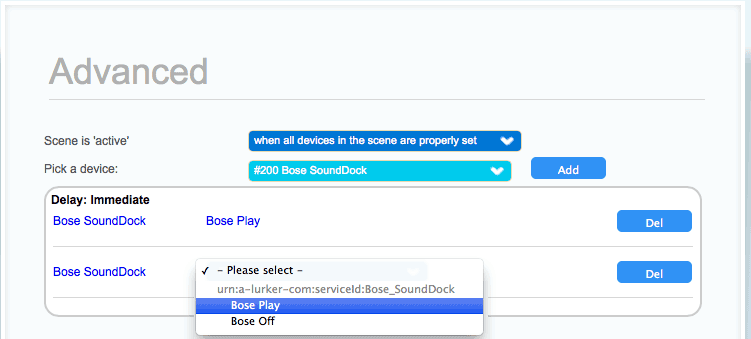 Figure 8: Using the IR Device in a scene
This is a bit of a long guide. However, when you've done this once, you will find that it all makes sense and you'll be able to create the next iTach controlled device much faster.
Reference
This application note is based on testing by Vesternet as well as many useful forum posts from the users of the VERA Forum, in particular thanks to forum members 'a-lurker' and ''konradwalsh'.
Related Information
- APNT-65: iTach Basic Configuration and Learning
- APNT-66: Using iTach with Fibaro Home Center
- APNT-34: Creating VERA Scenes
- APNT-35: Controlling VERA Scenes with a Trigger
- APNT-36: Controlling VERA Scenes with a Schedule
- KB-35: Difference between iTach Emitter and Blaster Cables
- KB-36: iTach API Information
- Global Cache Downloads and Documents


