This application note shows how to add the Secure (Hortsmann) Wall Thermostat and Boiler receiver to a Z-Wave network so they can be controlled by other devices and Z-Wave scenes.
The Secure Wall Thermostat (SRT321) and the Secure Boiler Receiver (SSR303) work as a pair of Z-Wave devices to control a boiler or other heating equipment. The Thermostat can also be used with any Z-Wave relay such as the Fibaro single (FGS-211) and dual (FGS-221) relays.
Note: These devices were previously known as Horstmann HRT4-ZW and ASR-ZW.
Adding them to the Z-Wave system is straight forward so long as you follow the instructions and wait for the thermostat to wakeup so that configuration settings are saved correctly. For this application note, I have used VERA to illustrate the process, other controllers will be very similar.
Thermostat (SRT321 / HRT4-ZW)
- Put your Z-Wave Controller (VERA) into 'Inclusion' mode and move the Thermostat close to the controller
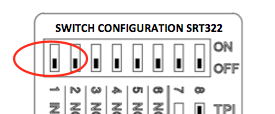
- Inside the Secure Thermostat move DIL switch 1 to the 'On' (up) position - this puts the thermostat into configuration mode
- Turn the Thermostat's dial until 'L' is displayed in the LCD - ignore the user manual that suggests 'I' should be displayed
- Push the dial to 'Include' the Thermostat, "L" will flash and change to "LP"
- The Z-Wave controller should now confirm that the Thermostat has been added to the network, wait while the controller saves details
- The controller may display 'Waiting to Wakeup to Configure', if so turn the dial until "n" is displayed and press the dial - this will place the Thermostat in configuration mode (also known as Wake-Up)
- The controller will make final configuration setting for the thermostat
- It's a good idea to reduce the Wakeup Interval from it's default of 1800 seconds, for testing I used 300 seconds (the minimum wakeup time is 240)
- When all configurations are saved move DIL switch 1 to the 'Off' (down) position - the thermostat is now in Normal mode
- You will probably need to click 'Save' or 'Synchronise' in your controller
- Note on Configuration: If you make any configuration changes, you must save these in the controller, and then Wakeup the thermostat to ensure the new configuration settings are transferred to the thermostat.
- VERA uses a generic thermostat icon for the Secure thermostat - this displays the room temperature and the setpoint temperature. It also shows the 'Off' and 'Heat' labels, however these do not work as the Secure Thermostat is just a thermostat without any switching elements
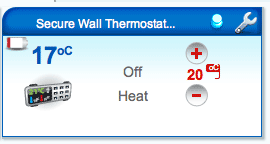
- You can test that it's working correctly by changing the thermostat's setpoint by moving the dial, the thermostat icon in VERA will show this after a few seconds delay.
Note: if you change the setpoint in the controller this will be communicated to the thermostat next time it wakes up, this could take up to 300 seconds if you have changed the Wakeup interval to 300.
Receiver (SSR303 / ASR-ZW)
- Install the Secure Receiver into the electrical system following the wiring instructions in the products user manual
- Switch the power on
- Move your Z-Wave controller close to the Receiver and put it into 'Inclusion' mode
- Press the Receiver's 'Network' button marked '>||<' the network LED will flash green and then the Off LED will become red
- The Z-Wave controller should now confirm that the Receiver has been added to the network, wait while the controller saves details
- VERA uses a generic thermostat icon for the Secure Receiver - the 'Off' and 'Heat' buttons work, but the temperature label has no function

Association
To get the most out of the Thermostat and enable easy use within scenes and rules it is best to directly associate the Thermostat with the Receiver. This means that the thermostat can directly control the receiver without having to communicate via the Z-Wave controller. It also means that the Thermostats's TPI control software is used to efficiently control your heating, help to save money and reduce wasted energy (see TPI Configuration below).
To associate the Thermostat with the receiver:
- On the Thermostat's icon click the 'wrench' and go to the DEVICE OPTIONS tab
- In 'Associations' enter '2' in 'Group ID' - the thermostat sends it's control commands to Z-Wave Group 2
- Click 'Add Group'
- Click 'Set'
- Choose the Receiver from the list of devices - Device ID 48 in this example
- Click 'Back to ZWave options' (you will need to scroll down)
- Close the DEVICE OPTIONS tab and click 'SAVE' in the main VERA Window
- Wake up the Thermostat by moving it into configuration mode so that it accepts the changes
- Wait for VERA to complete this save

- When changes are complete, change thermostat into Normal mode (move DIL 1 to Off)
- If you're using another Z-Wave controller, take a look at - Application Note 19 - Associating Devices in Z-Wave Controllers
TPI Control Software
The Secure SRT321 and Horstmann HRT4-ZW Thermostats include TPI (Time Proportional Integral) software algorithms that enable the thermostat to control the heating much more efficiently than a simple On/Off thermostat. The TPI algorithms reduce over temperature over swing and reduce the times the heating is turned On and Off, helping to reduce heating costs and wasted energy.
This is one of the reasons we recommend operating the Secure thermostat in a direct association mode so that it can directly control the boiler or heating source.
To ensure you use the correct TPI algorithm you need to set the DIL switches to fit your type of heating system - gas boiler, oil boiler or electric heating.
Fail Safe Mode
The Secure Receiver includes a Fail Safe mode that prevents the receiver staying ON if it loses contact with the Secure Thermostat. The receiver can only enter Fail Safe mode when the receiver is On - it does not get activated when it is OFF.
In normal operation the Secure Thermostat sends a signal to the receiver every 45-50 minutes. If the receiver does not receive this signal, it will go into Fail Safe mode after 60 minutes.
If you are using the receiver without a thermostat, such as for hot water control, then you need to be aware of this Fail Safe mode.
For instance, if you turn the receiver On via a Scene, the receiver will enter Fail Safe mode after 60 minutes.
Therefore, for these types of scenes, you should have the scene set the receiver to 'On' every 30-45 minutes during its 'On' schedule period.
One way to do this is to use "Delays" in the scene - configure delays to repeatedly send 'on' throughout the duration of the scene's schedule.
Related Information


